|
|
Post by Tai-Shon Quinn on Oct 10, 2005 16:00:27 GMT -5
 Could someone post up a rotoscoping tutorial please?
|
|
|
|
Post by Leda EmBorr on Oct 12, 2005 2:45:40 GMT -5
Posted by Olos Nay on Oct 10, 2005, 11:16pm
The best I have found, from the posts here, by Primrodo, on Photoshop:
Adding Blade glow using Photoshop
Start with a layer of black, change teh mode to screen, and now you see through.
Then I draw a solid white over the blade.
I duplicate the layer 3 times (Ctrl+J)
On the 2nd layer I gaussian blur 10
On the 3rd, 20
4th- 30
On teh first anywhere from .5-2, depends on how close or far. Those three numbers are interchangeable, 5, 10, 15...20, 40, 60 etc.
Then merge the 4 layers. So now you have pretty well a White saber...
Hit Ctrl+B for colour balance and go to town.
Pump the mid tone colour of your choice to 100 and the highlight of it to 50.
|
|
|
|
Post by Leda EmBorr on Oct 12, 2005 2:48:22 GMT -5
This is the method that I use as well, but I usually end up with about 6 or 7 layers of blade before merging. (thanks Primrodo!  ) The only thing that I have to add to that is that the amount of blur you add in each layer depends on the size of the image you are working with. Also the number of layers will vary depending on image size. Those numbers are a guide, but you have to play with it until it looks right to you... sometimes over and over again... it's good practice also. And the straight line thing depends also on the angle of your blade. You can use a straight line, but I think that if you taper and/or foreshorten the blade it just looks more real (well, as real as a fictional item can look!). I draw the blade shape using the polygon lasso tool and then fill it in with white. Then I free transform and nudge it until it looks just right. |
|
|
|
Post by Leda EmBorr on Apr 17, 2006 21:37:53 GMT -5
|
|
|
|
Post by Johann Shinobi on Apr 18, 2006 19:25:05 GMT -5
I usually use a Program called Eye Candy 4000, that is a plug in for both, Photoshop, and Corel Photopaint. I can share if anyone is Interested. I works well for a quick job, not as nice as Leda's jobs.
|
|
|
|
Post by The Lost Skywalker on Apr 18, 2006 19:35:42 GMT -5
Oh man...I used to have that until my main computer went comatose and I lost the CD in a move...Now I'm on EC 3 that my buddy had, and it's not as cool, grrr...
Share, please, with a fellow Jedi who need to get his Photoshop back up to personal standards?
|
|
|
|
Post by Dak Jerek on May 7, 2006 2:51:27 GMT -5
i just tried the rotoscoping tutorial video from TFN, and it works so well! pretty easy, too. having a video/audio guide really helps a lot. thanks so much for posting that. most of the tutorials i find on the web are many years out of date.
|
|
|
|
Post by Ldi-Ovef Te_Azi on May 8, 2006 15:07:46 GMT -5
|
|
|
|
Post by Granny-Wan on Oct 17, 2007 21:27:09 GMT -5
For a quick and easy blade in Photoshop Elements... (not as great looking as some but fun for showing kids and those who are not perfectionists....) Using the line tool, draw a line in the color blade you want (blue, purple, green, whatever) a few pixels wider than the blade. Then click on SIMPLFY Use FILTER, BLUR, GAUSSIAN. The number of pixels you blur will depend on how thick your line is. Blur it until it's as transparent as you want. Go back to the line drawing tool, and draw a white line a few pixels narrower on top of the colored line. Use FILTER, BLUR, GAUSSIAN, and blur it until it looks good. It will be less of a blur than you used on the colored line. You can adjust the amount of blur or the shade of color until it looks good to you. You can also add another line of color if it isn't dark enough, you just have to move the layer into the right position to see it (move it behind the white layer) You will have to SIMPLFY each layer before you can blur. These blades were made from scratch on a 600 pixel wide white background. Colored lines were 20 pixels, blurred 10. White lines were 15 pixels, blurred 7. This method is "quick and dirty" and works with or without an actual blade in the picture.  |
|
|
|
Post by Kryy Jacobi on Oct 17, 2007 23:24:05 GMT -5
I did ONE in Elements about two years -- sort of stumbled around tweaking this and that to get results I liked and have never been able to duplicate it.... Failed I have....  Have you ever done a lasso around the blade and filled it in and then blurred or filtered? I can't draw as straight a line as I'd like with a mouse. With a pencil, amazingly straight... with a mouse, alas no.... Don't have Photoshop, so Elements is the way I have to go. Thanks for the tips! :-) |
|
|
|
Post by Granny-Wan on Oct 18, 2007 0:13:59 GMT -5
I did ONE in Elements about two years -- sort of stumbled around tweaking this and that to get results I liked and have never been able to duplicate it.... Failed I have.... Have you ever done a lasso around the blade and filled it in and then blurred or filtered? I can't draw as straight a line as I'd like with a mouse. With a pencil, amazingly straight... with a mouse, alas no.... Don't have Photoshop, so Elements is the way I have to go. Thanks for the tips! :-) Remember, if you mess up the line, you can EDIT, UNDO and try it again... |
|
|
|
Post by Seda Navilli on Oct 20, 2007 12:44:02 GMT -5
The first post, Leda's method, gets the best results and is the one I use as well. What makes it good is also how simple it is. I call it the "once, twice, thrice" method, because of the video that made it popular.
The only difference I can note is that I make the gaussian blur directly related to the blade width. For example, if the blade width is 5 pixels then I make the three blurs 5, 10 and 15 pixels. The number changes as the blade size changes.
Also another tip I can give is to fiddle around as much as you like when making the blades, as opposed to following strict guidelines. Usually if you follow someone's example exactly then it will never turn out right... because every photo is different. Oh and get Photoshop, its an incredibly useful program. ;D
|
|
|
|
Post by andradir on Feb 22, 2008 10:25:55 GMT -5
I personally prefer to use a different tool which gives very nice results: particleillusion => www.wondertouch.com/It looks slightly different than the usual light saber blades, but makes a very interesting and realistic lightsaber. Here is a small animation I made with a short scene from a friend: youtube.com/watch?v=obpOm_Q5dOMYou see: it's perfect especially for animated scenes. |
|
|
|
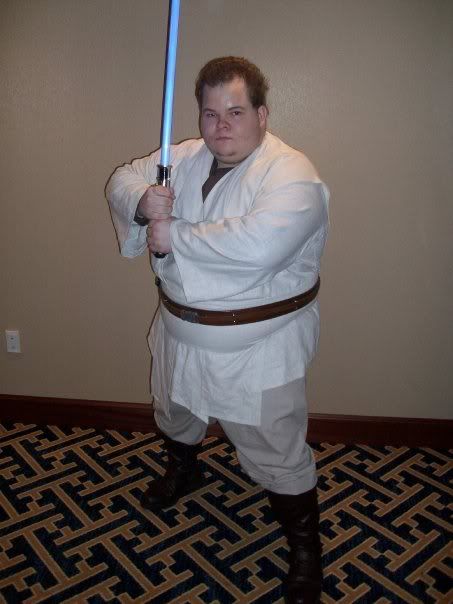
Post by Obi-Jeff Kenobi on May 27, 2009 14:45:51 GMT -5
Hey everyone here is my Lightsaber tutorial on how i make Saber effects using Adobe Photo shop 7.0 also if anyone wants a copy of the program just add my msn xbxjeff@hotmail.com and i send you a copy.
|
|

 Could someone post up a rotoscoping tutorial please?


 )
)