|
|
Post by the.rebel.agent on Jan 6, 2009 11:25:54 GMT -5
As usual, new year, new project. I have been thinking how to start them and finally did it. Last weekend I started to work on them. They are going to be based on solid ones with minor improvements. We will be talking about the improvements later. First is first, here you will see the initial work I did. I did cast two pieces of each one and severed the lead from each. Later got the body severed. They will be used as a base for the mold once I re-sculpt them. Lead and body will have to fit like a glove. That's the tricky process here. But, don't want to bother you will more technical details. Photos and explanation here: 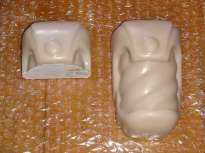 www.theforce.com.ar/Scripts/WebFormsLibrary/MainContainerForm.asp?iAction=2&lNewsId=201 www.theforce.com.ar/Scripts/WebFormsLibrary/MainContainerForm.asp?iAction=2&lNewsId=201Remember that I will be sculpting them based on the original photos. They will match the measurements of the solid ones but functional. |
|
|
|
Post by the.rebel.agent on Jan 23, 2009 23:41:24 GMT -5
OK, as I promised, this is the second step. Once I separated the body from the lid I had to carve and sculpt them to assemble each other. Was not easy but I finally did it. They are not a perfect match yet, but they will do. Thanks the Force Dremmel exists! 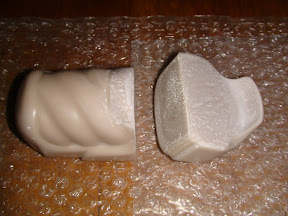 Check here for more photos and description. Don't forget to click on each photo to see the high resolution one: www.theforce.com.ar/Scripts/WebFormsLibrary/MainContainerForm.asp?iAction=2&lNewsId=203 |
|
|
|
Post by D-Wan on Jan 24, 2009 22:09:19 GMT -5
These are looking good. Any idea on when they might be available for purchase?
|
|
|
|
Post by the.rebel.agent on Feb 3, 2009 10:59:18 GMT -5
Actually they don't have a sell date. Still in development. Will keep you posted about them. Hope to have them ready in a few months.
|
|
|
|
Post by the.rebel.agent on Feb 10, 2009 14:27:01 GMT -5
This is a sneak preview of the models. They are just the first prototype with primmer.  Detailed photos here: www.theforce.com.ar/Scripts/WebFormsLibrary/MainContainerForm.asp?iAction=2&lNewsId=205Your feedback will be welcome. Still looking for a good closure method. Velcro like the original or magnetic like the hook pouch I did in the past. What do you think guys? Don't be afraid to criticize them, as I told, feedback will be crucial before I start doing the molds. PS: Don't forget to check the high resolution photos doing click in each photo. |
|
|
|
Post by Zhar Tah-Jot on Feb 11, 2009 12:26:08 GMT -5
Just wondering . . .
Would velcro be more secure than magnet? If so, velcro would be my pick. ;D
|
|
|
|
Post by Kryy Jacobi on Feb 11, 2009 18:59:42 GMT -5
Not necessarily... my favorite pouch has a snap magnet thing, like a purse snap. It's very easy to open and close with one hand, whereas some other closures take two hands to get the snap or velcro aligned correctly. But everyone has their personal preferences.  BTW, very nice work, Diego! |
|
|
|
Post by the.rebel.agent on Feb 12, 2009 14:21:18 GMT -5
Kryy Jacobi is right. Magnetic closure will be easy to open with only one hand. And thanks for your feedback.
|
|
|
|
Post by the.rebel.agent on Feb 19, 2009 9:53:11 GMT -5
BTW, I am getting the correct hinges today. Mechanical one uses a smaller one. Small one will use the one used by the hook pouch and the comlink one will use the bigger one available from DU-BRO. I am doing a little improvement to the original model; something I noticed after check and re-check the photos. Will post photos next week for sure.
|
|
|
|
Post by the.rebel.agent on Feb 24, 2009 9:50:57 GMT -5
Talking about modifications... I did a little modification to them (the pouch lid especially) to match the original ones is shape and dimension. First photos will show how they looked before I modified them. Next ones are the new prototypes. They will be the last ones unless I find another flaw. And you will also see the hinges I was able to get. Still waiting for the bigger one. Will be arriving to Argentina in about 15 days or so. Everything is falling into place. You will see the difference between them ASAP you check the photos I posted here: 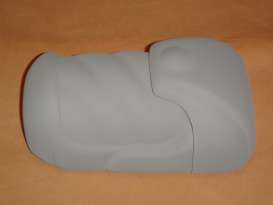 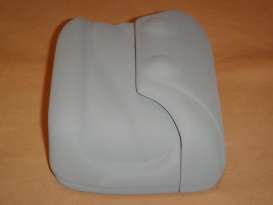 www.theforce.com.ar/Scripts/WebFormsLibrary/MainContainerForm.asp?iAction=2&lNewsId=209 www.theforce.com.ar/Scripts/WebFormsLibrary/MainContainerForm.asp?iAction=2&lNewsId=209Soon I will be doing the molds. My intention was to do the lid hollow as the body, so I will be fixing the hinges from the outside in both parts. That will give more room at the interior of them. Some originals pouches (screen used) have solid lids and some don't. So, mechanical pouch will have two smaller hinges, the small pouch will have a medium one and the comlink will have the bigger one. Don't hesitate in contact me If you have something to say about them. |
|
|
|
Post by Ani-Chay Pinn on Feb 24, 2009 19:03:57 GMT -5
I was just wondering how heavy the final pouches would be? And what do you paint them with. They're looking nice so far.
|
|
|
|
Post by the.rebel.agent on Feb 25, 2009 10:21:54 GMT -5
I was just wondering how heavy the final pouches would be? And what do you paint them with. They're looking nice so far. This one, which is not functional but hollow is about 200 grms. Including the metal clip and acrylic base. Was painted with acrylic paint. Water based. This one was the heaviest one second to the hook pouch which is about 250grms or so.  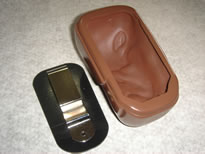 More photos here: www.theforce.com.ar/Scripts/WebFormsLibrary/MainContainerForm.asp?iAction=2&lNewsId=116Since functional ones will be made in two parts, overall weight will be more or less 200 grms. Acrylic base won't be necessary but I will be adding hinges and screws. It is just an estimate. Hope this helps. PS: this is how I painted them: www.youtube.com/watch?v=1KBI5-pg670&feature=channel_page |
|
|
|
Post by the.rebel.agent on Mar 3, 2009 14:12:03 GMT -5
As usual this "post" is to keep you "posted" about this project. Since the models are ready to be molded, last week I did the mold boxes and some other details that you will be able to see here: 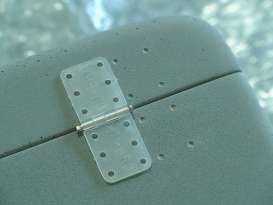 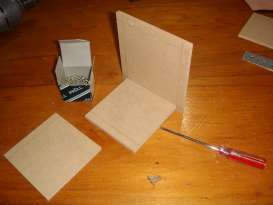 www.theforce.com.ar/Scripts/WebFormsLibrary/MainContainerForm.asp?iAction=2&lNewsId=210 www.theforce.com.ar/Scripts/WebFormsLibrary/MainContainerForm.asp?iAction=2&lNewsId=210I will be doing the silicon rubber molds this week. Still waiting for the bigger hinge, so the comlink mold will have to wait. Don't want to do it without the hinges marks. So, If you have any question, don't hesitate in contact me. |
|
|
|
Post by Ldi-Ovef Te_Azi on Mar 3, 2009 14:16:38 GMT -5
functional, i like functional
|
|
|
|
Post by the.rebel.agent on Mar 10, 2009 10:41:03 GMT -5
I just pulled out the first cast from each mold and put them together for the photo shots. But, first is first. I will show you how I did the molds and later, how the final cast looks like. Because it was a lot of information I split the post. The first one is titled Mold Making and the second one will be pulling out the first cast. You will be able to see how I did the molds, the methods I used for, and some secrets that I revealed. Have in mind that I had to wait 24 hs before used the mold after I poured the silicon rubber and 24 hs more after that to pour the resin. Added to this post some boring videos enjoy them. Here is the first link: 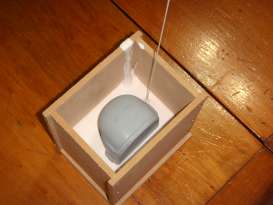 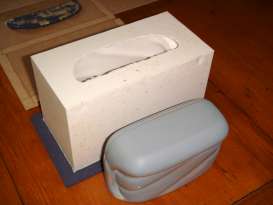 www.theforce.com.ar/Scripts/WebFormsLibrary/MainContainerForm.asp?iAction=2&lNewsId=211 www.theforce.com.ar/Scripts/WebFormsLibrary/MainContainerForm.asp?iAction=2&lNewsId=211Once I had all the molds and 1 bottle of resin ready to use, poured the polyester resin inside them. I rotated the molds once the resin was inside to create the pieces you are going to see. This time added some cool videos and will demonstrate how functional they are and what they will be able to store beneath them. Have in mind that they were just a test: You will some air bubbles here and there, but the molds are just perfect. They don't have any defect inside. Here is the second link: 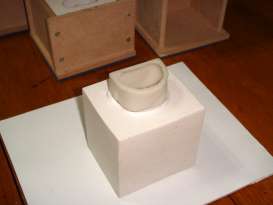 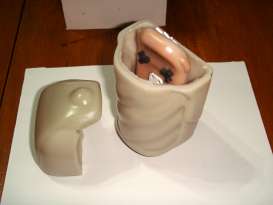 www.theforce.com.ar/Scripts/WebFormsLibrary/MainContainerForm.asp?iAction=2&lNewsId=212 www.theforce.com.ar/Scripts/WebFormsLibrary/MainContainerForm.asp?iAction=2&lNewsId=212I want to thank you all for the help, feedback and support provided. They are finally true. Wanted to have them since 2005, but have to wait until now. Each post contains a Spanish tutorial describing in very detail what I did, so I you dare to read it, and translate it, will learn something useful. I am very proud of the final result. I am almost ready to start a run. If you have any doubt about the process or the materials don't hesitate in contact me. PS: Don't miss the comlink demostration video! |
|